Based on Sandy Good’s presses at San Francicso Center for the Book
Materials and Equipment
2 pieces of wood, 12″ x 1½” x 3/8″
2 ¼” carriage bolts, 3-4″ long
2 ¼” wing nuts
2 ¼” washers
2 pieces of Davey* board each 10¼” x 8¼” (grain long)
2 pieces of paper each 10¼” x 8¼” (grain long)
Drill with ¼” bit
Glue
Clamps
* Davey board is a heavy, dense, single-ply board used for making book covers and boxes. It’s about 1/8″ thick. It’a available online at Talas, Hollander’s, and Paper Source, among others. You can substitute 4-ply museum or mat board (available at most good art supply stores). It’s easier to cut and warps more than Davey board, but the extra warping is a good thing for this finishing press.
Directions
- Glue a piece of paper to one side of one of the pieces of Davey board, repeat with the other piece of paper and board. This will warp the Davey board, making it bow out, allowing the press to stand up. Let dry.
- Glue the paper-covered side of the Davey board to one of the pieces of wood, with the 10¼” edge of the Davey board flush to the horizontal top edge of the wood. Clamp and let dry. Repeat with the other piece of board and wood.
- Clamp the 2 pieces of wood together, Davey board side touching. On one end, drill a ¼” wide hole, half way between the Davey board and the end of the wood and in the vertical center. Repeat on the other end. Clamping them together will ensure the holes line up. Unclamp.
- On one piece of wood, “hog” out the holes with the drill, making them a bit wider. This will make the press open and close more easily. On the other piece, insert the bolts, starting from the side without Davey board. On the Davey board side, put on a washer and wing nut. While holding the bolt head, tighten the wing nut until the square under the head of the bolt pulls into the wood. This secures the bolt so it doesn’t rotate as the press is opened and closed. Repeat for other bolt.
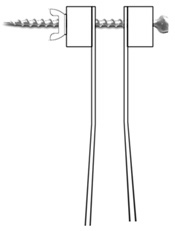
- Remove the washer and wing nuts, and put the second piece of wood through the bolts, Davey board side first. On the opposite side, put a washer and wing nut on each bolt, as in the picture of a side view of the press to right.
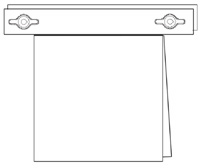
- Place your book, spine end up, between the 2 pieces of wood. Close the press and tighten the wing nuts to hold the book in place. Now you can work on the spine.